Advanced Antenna Modeling, a new book by Marcel De Canck, ON5AU, is 584 pages devoted to getting the most out of EZNEC and AutoEZ. Numerous example models are analyzed in detail and many practical tips and tricks are included. Model files available here. On the Amazon Kindle and Amazon Paperback web pages the "Look inside" feature may be used to show the table of contents, other front matter, and the first few chapters. That will provide a sense of the scope and style of the book.
You may also be interested in the three volume set Practical Antenna Models, also by ON5AU. Each volume includes more than 135 downloadable EZNEC and AutoEZ model files. Model files available here.
Please note that I have no financial connection to the sale of any of these books.
Acknowledgment
During the development of AutoEZ many people assisted with alpha and beta testing, contributed model files, reviewed the documentation, and suggested ideas for improvements. In particular I am indebted to:
Charles Fontenot, K5UALinks to personal web pages are included above. Click to see what these folks were doing when not putting up with my endless excuses of "That's not documented yet" and "I haven't solved that problem yet."
Eric Hecker
Bob Hicks, W5TX
Dan Kaeo, KF6A
Terry Lower, N8QS
Greg Ordy, W8WWV
Danny Richardson, K6MHE (SK)
Rudy Severns, N6LFSpecial thanks also to Roy Lewallen, W7EL, for modifying the EZNEC source code to support the AutoEZ interface.
Introduction
AutoEZ is an Excel application that works in conjunction with the EZNEC¹ v. 5.0, v. 6.0, and v. 7.0 antenna modeling programs by Roy Lewallen. AutoEZ allows you to use variables to control diverse aspects of the model. You can then run multiple EZNEC test cases while AutoEZ automatically changes one or more variables between runs.
The model can be changed in several ways. The simplest (no variables involved) is to just use a different frequency for each test case, equivalent to a normal EZNEC frequency sweep. Or you can specify that one or more wires in the model are to be rotated, moved, scaled, or have a different segmentation level between runs, all without the need to create any Excel formulas or make any other changes to your existing model file. And by using Excel formulas (such as "=A" or
"=100-P") you can change almost any aspect of the model, such as the length of a wire, the circumference of a loop, the placement of a source, the impedance of a load, or the component values of a network.The AutoEZ user interface is, by design, very similar to the EZNEC user interface so you'll have no trouble switching from one to the other. Whereas EZNEC uses separate windows to show various aspects of the model (Wires, Sources, etc.), AutoEZ uses separate sheet tabs and/or separate groups of cells on a single sheet.
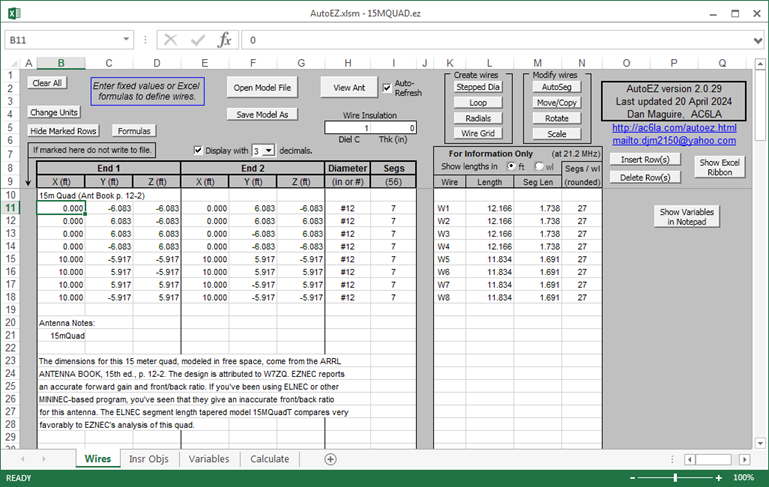
For example, above is the Wires sheet of the AutoEZ workbook. It is equivalent to the Wires window of EZNEC plus it has some separate "For Information Only" columns and several buttons that can be used to manipulate the wires or perform other actions.
This particular screen capture was done after opening the 15MQUAD.ez model, one of the samples that is included with EZNEC. With AutoEZ you can mix comments in with the wire definitions. Row 10 shows the "Description Title" that appears at the top of the EZNEC main window. Rows 20+ show the text from the "Ant Notes" associated with this model.
You can use any EZNEC v. 5.0 or v. 6.0 program type: Demo, Standard, Plus, Pro/2, or Pro/4. With v. 5.0 you must have revision level v. 5.0.60 or later. AutoEZ can also be used with EZNEC v. 7.0 Pro/2+ and Pro/4+.
AutoEZ requires Excel 97 or later (97, 2000, 2002/XP, 2003, 2007, 2010, 2013, 2016, 2019, 2021, 2024, or Office 365). AutoEZ will not operate correctly with other spreadsheet software such as Open Office Calc, Quattro Pro, Microsoft Works, Excel Starter, or versions of Excel earlier than Excel 97. None of these other spreadsheet programs fully support the macros used by AutoEZ.
The following steps will walk you through getting started with AutoEZ and show a few simple examples of what the program can do.
¹EZNEC® is a registered trademark of Roy W. Lewallen.
Step 1 - Check Excel Update Level
Whichever version of Excel you have, it is important to insure that the latest Service Pack update has been installed since it is virtually impossible to maintain program compatibility with all the back-levels of Excel. As of early 2019 the most recent update levels are:
- Excel 97: Service Release 2(l) - SR-2(l) [lower case "L" in parenthesis]
- Excel 2000: Service Pack 3 (SP-3)
- Excel 2002/XP: Service Pack 3 (SP3)
- Excel 2003: Service Pack 3 (SP3)
- Excel 2007: Service Pack 3 (SP3)
- Excel 2010: Service Pack 2 (SP2)
- Excel 2013: Service Pack 1 (SP1)
- Excel 2016: No Service Pack
- Excel 2019: Automatically updated
- Excel 2021: Automatically updated
- Excel 2024: Automatically updated
- Office 365: Automatically updated
With Excel 97 - 2003, click on Help > About. With Excel 2007, click the large "Office" button, then "Excel Options", then "Resources" (left margin), then "About". With Excel 2010 click File > Help, then on the right side of the Help page click the underlined "Additional Version and Copyright Information" link. With Excel
2013 - 2019 click File > Account > About Excel. Here are a few examples of what you should see.
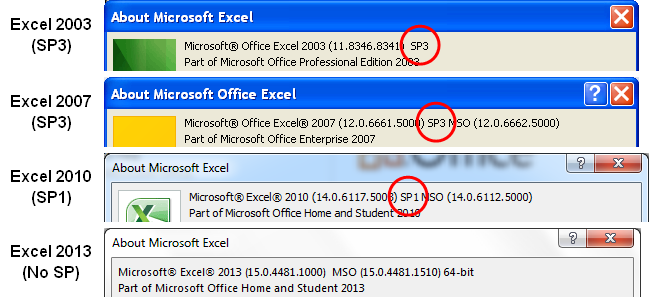
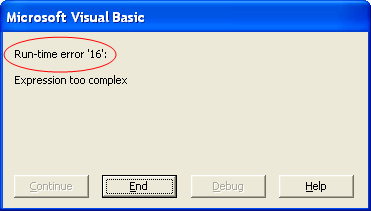
If you don't see any "SP" letters (except for 2013-2019) or if you see a Service Pack number lower than what is mentioned above, you have a back-level of Excel. AutoEZ may not operate correctly and/or you may experience various 'Run-time error' failures. This is especially true for Excel 2007. If you are using the initial release of Excel 2007 (no Service Pack) or the SP1 release, it is almost certain that you will see this:
You can get the most recent updates for all Microsoft products by visiting the Microsoft Update site. You may be asked to download the latest version of Microsoft's update tool. When that is done, click the "Express" button. You can then decide whether to download and install all high-priority updates or only those that apply to Microsoft Office.
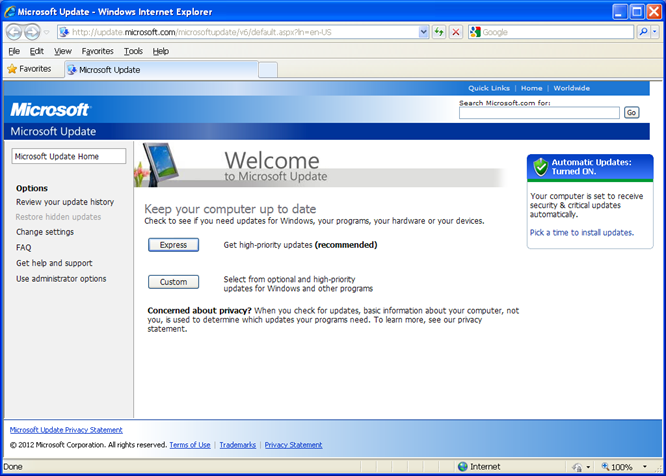
If you would rather skip the Microsoft Update site just do a search on "Office 20xx Service Pack x" (replacing "x" with your version of Office and the SP number you want) to find the appropriate direct link to a Microsoft download site. Note that the most recent Service Pack always includes all fixes from previous levels. So, for example, if you are now at the SP1 level and the latest is SP3, there is no need to download and install SP2.
Step 2 - Enable Excel Macros
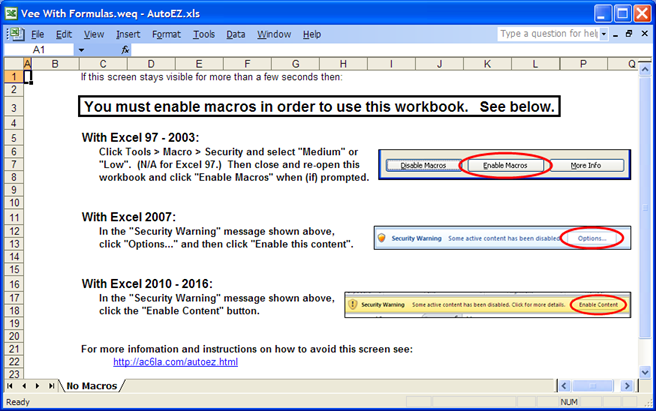
After you install AutoEZ by running the Setup.exe program you will of course want to take it for a test drive. You might choose "Launch AutoEZ" from the final screen of the Setup process, or you might choose AutoEZ from the Start Menu, or you might double-click on the AutoEZ desktop shortcut. And very likely you'll end up with a screen that looks like this (or similar, depending on Excel version).
At which point you will wonder what a macro is and what any of this has to do with AutoEZ, EZNEC, or antenna modeling.
First things first. In a typical Excel workbook, all the processing is done via formulas that are found in one or more cells. For example, if you entered a value of "10" in cell A1, a value of "16" in cell A2, and the formula
"=A1+SQRT(A2)" in cell A3, when you press Enter the formula in cell A3 will be evaluated to produce a value of "14". No program is needed to calculate the value for cell A3 except the Excel program itself.However, AutoEZ is not a typical Excel workbook. It contains not only formulas in cells on various sheets but also roughly 33000 lines of Visual Basic code (not counting comments). This code is split up into several hundred macros which are like small programs that run when a button is clicked, when a different sheet tab is selected, or when the workbook itself is opened or closed. And as with any other program it would be possible to embed viruses or other malware into the code.
Because of this potential security threat, Excel will not allow macros to be run by default. Instead, you should first assure yourself that the workbook in question is reliable. Don't take my word for it, use your anti-virus software to either scan the Setup.exe file before running it or scan the AutoEZ.xls workbook before opening it for the first time. With many anti-virus packages you can navigate to the file in Windows Explorer, right-click on the file name, then choose "Scan for threats" or similar wording in the context menu. Check your anti-virus package help under a topic such as "scan a single file" for details.
After you are sure the workbook is safe you must then enable Excel macros. If macros are not enabled AutoEZ will not function properly. None of the buttons will work and the interface to EZNEC will not be operational. And that brings us back to where we were.
Excel 97 - 2003:
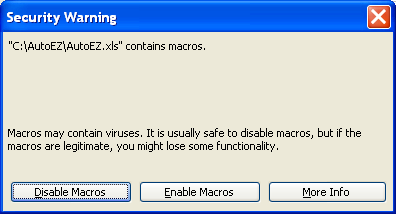
If you are using a version of Excel at or below 2003 you might have seen a Security Warning dialog like this before anything else.
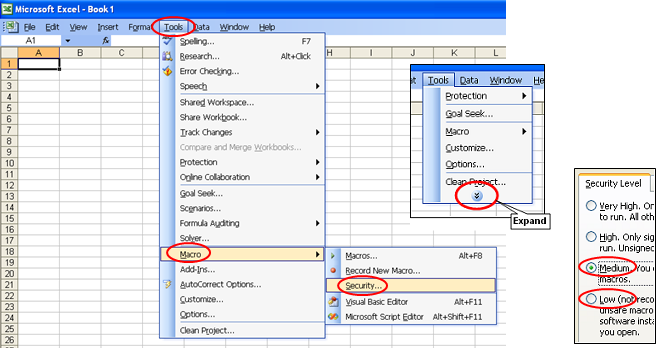
Reading the dire warning from Microsoft you probably chose the "Disable Macros" button, not realizing that the words "you might lose some functionality" actually meant "33000 lines of Visual Basic code will not be allowed to run." To fix things, on the menu bar near the top of the Excel window click Tools > Macro > Security. (If you don't see the Macro or Security choices, click the "expand menu" arrow at the bottom of the visible list.) On the Security Level tab, choose either Medium or Low. If you choose Medium you will be given the option of enabling macros each time you open a workbook. If you choose Low macros will be automatically enabled.
Note that with Excel 97 there is no Security choice under Tools > Macro. You will be given the option of enabling macros by default.
Now close the AutoEZ.xls workbook without saving, then use File > Open and re-open it. If you chose Medium security level, this time click the "Enable Macros" button in the Security Warning dialog.
Excel 2007:
With the newer versions of Excel it is not necessary to close and then re-open the AutoEZ workbook. With Excel 2007, if you look closely just below the ribbon you'll see a "Security Warning" message.
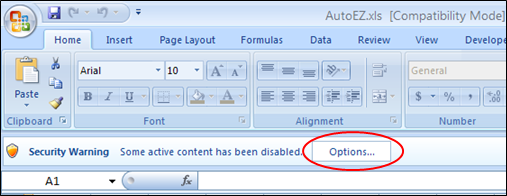
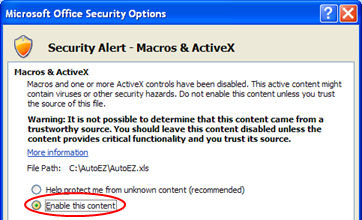
To enable macros on a one-time basis click the Options... button. In the dialog that follows select the Enable this content option.
To avoid this prompt in the future click the large "Office" button and then the "Excel Options" button.
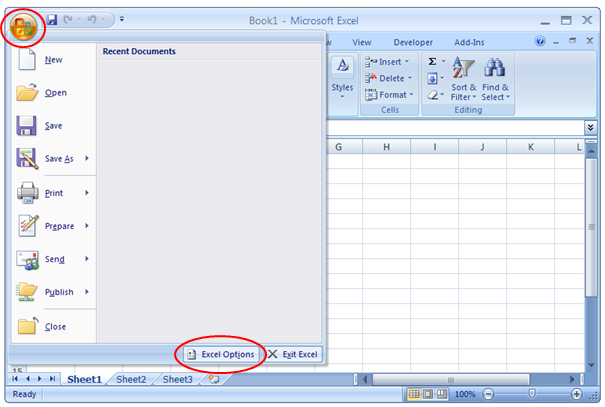
In the Excel Options window, select the "Trust Center" option and then click the "Trust Center Settings" button.

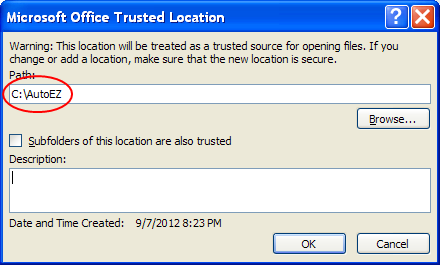
In the Trust Center window, select the "Trusted Locations" option and then click the "Add new location" button.
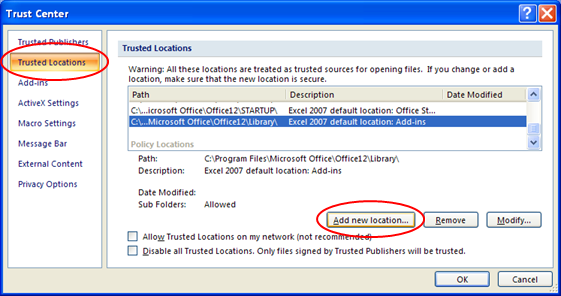
Finally, in the Trusted Location dialog, browse to the folder that contains the AutoEZ workbook ('C:\AutoEZ' in the example below although you may have installed to a different folder) and add that folder as a trusted location. Making the AutoEZ folder a "trusted location" avoids being prompted each time you open AutoEZ.
Excel 2010 - 2021:
With Excel 2010 - 2021 the "Security Warning" message is a little more obvious.
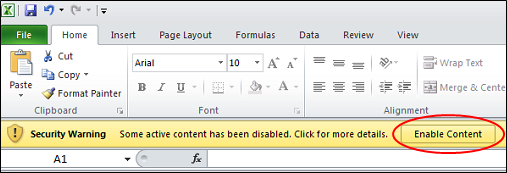
If you click the "Enable Content" button, that particular workbook in that particular folder will automatically have macros enabled now and in the future. If you change the name or open a copy of the workbook from another folder you'll have to click the "Enable Content" button again.
Excel 2024 - Microsoft (Office) 365:
With Excel 2024 and 365, in addition to enabling macros as described above re the "Security Warning" message, you must also explicitly enable ActiveX controls as explained here and here. If that is not done you will likely see a Run-time error 57121 message like this.

Again, to avoid that error see the Microsoft instructions here and here.
No matter which version of Excel you have, if macros are enabled you will see the "You must enable macros" screen only very briefly before being presented with the "normal" AutoEZ workbook sheets.
If you are using Excel 2007 or later the next thing you see will be a message telling you that the workbook has been converted to .xlsm format.
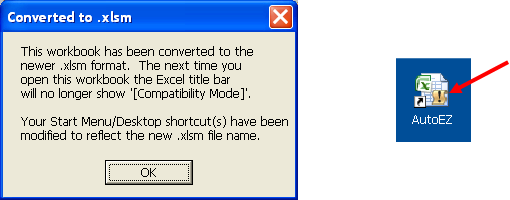
The .xlsm format is just a different way of storing an Excel workbook. The .xlsm format will open and close much faster than the standard .xls format, but .xlsm is not available in versions of Excel prior to Excel 2007. The first time you open a newly-installed AutoEZ workbook (with macros enabled), AutoEZ will detect which version of Excel you have. If it's 2007 or later the workbook will be converted to .xlsm format. This has absolutely no effect on any AutoEZ functions or on the interface to EZNEC.
The AutoEZ shortcut icon on your desktop will include an exclamation mark. This is the standard way of Excel informing you that the workbook contains macros and is in .xlsm format. (The color of the mark and other details of the icon will vary depending on the Excel version.)
International users: Some non-English language versions of Excel may show an error when attempting to convert from .xls to .xlsm format. If you see a message with the words "unreadable content" (in your language) please contact me directly. There is an easy workaround to avoid the problem.
Step 3 - Open a Model
That's it for changing Excel, now on to AutoEZ itself. Before continuing, start EZNEC (v. 5.0.60 or later) and leave it running in a separate window on your desktop. Then come back to the Excel window with AutoEZ and (if necessary) tab to the Wires sheet. "Tab to" a sheet means "click on" the sheet tab in the row of tabs at the bottom of the Excel window. You can also use Ctrl-PgUp and Ctrl-PgDn to switch between sheets.
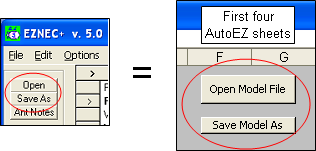
When you first start AutoEZ you will see the antenna model file that was last used with the program, similar to the way EZNEC starts with the LAST.EZ file. To open a different model file you use the AutoEZ Open Model File button which is equivalent to the Open button on the EZNEC main window. The Open Model File and Save Model As buttons are duplicated on the first four AutoEZ sheets, where you are likely to spend most of your time.
The Open Model File button can be used to read AutoEZ (.weq), EZNEC (.ez), NEC (.nec or .inp), AO and NEC/Wires (.ant), and
MMANA-GAL (.maa) format model files. The Save Model As button can be used to save the current model in AutoEZ (.weq) or EZNEC (.ez) formats.Although AutoEZ has the "look and feel" of a normal application program remember that it is actually just a very sophisticated Excel workbook, similar to one you might use already to track your investments or manage the family budget. Hence you "Open" AutoEZ with Excel, even if you do that by selecting a Start Menu entry or by double-clicking a desktop shortcut. Then once AutoEZ is running you use one of the AutoEZ buttons to "Open" a model file. You can't double-click on a model file in Windows Explorer to open it with AutoEZ, you must have AutoEZ running first and then use one of the Open Model File buttons.
You also can't use the Excel menu bar (ribbon in newer versions of Excel) to open a model file. In fact, to avoid any confusion the Excel menu bar (or ribbon) is normally hidden when the AutoEZ workbook is active. Anything you want to do with AutoEZ you do by using the various buttons.
A word about sample models:In the AutoEZ documentation you will see references to many different sample models, typically found in folder "C:\AutoEZ\Sample Models" if you installed to the default location. Some are EZNEC type models. They have an ".ez" file extension, although you may not see the extension depending on your Windows settings. Four of these (BYVEE, BYDIPOLE, 15MQUAD, 20M5ELYA) are copies of the same models found in the EZNEC samples folder, duplicated for convenience (with permission) so you won't have to switch folders while working through the AutoEZ documentation.
Other samples are AutoEZ type models with a ".weq" extension. File type ".weq" is a special format used by AutoEZ which preserves any variables and formulas that may have been used in the creation of the model.
If you are ever confused as to which model you are currently using just look up at the title bar of the Excel/AutoEZ window. The file name of the model is shown there. With AutoEZ Demo some of the sample model names will have a "(d)" suffix.
Using the Open Model File button, open sample model BYVEE.ez. If you are on the Wires sheet you will see the XYZ coordinates for the two wires that are used in the model. You can then tab to the Insr Objs (Insertion Objects) sheet to see the details for the single source of the model, in this case a "Split Source". On either sheet you can use the View Ant button to invoke the EZNEC "View Antenna" window.
EZNEC "View Antenna" for BYVEE.ez
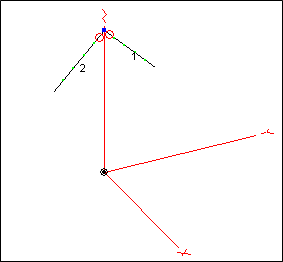
In EZNEC, most of the details about the model are viewed and/or changed using the Wires, Sources, Loads, Trans Lines, Transformers, and L Networks windows. With AutoEZ, this same information is found on the Wires sheet and as separate tables on the Insr Objs sheet.

Important: When you are done working with an EZNEC window, such as the "View Antenna" window, you will need to "re-activate" the AutoEZ (Excel) window. To do that you can click anywhere on the AutoEZ window (if the EZNEC window is not filling the entire desktop) or you can click on the Excel/AutoEZ icon in the taskbar. However, the first mouse click will only switch the active window. If you click on an AutoEZ button and nothing happens, it is probably because the first click only changed the active window. Once AutoEZ is the active window, then a click on a button will invoke the desired action.
Step 4 - Run a Calculation
Tab to the Calculate sheet. The Calculate sheet is the nerve center of AutoEZ. After you have opened an existing model or created a new one from scratch, made the desired changes on the Wires and Insr Objs sheets, and perhaps annotated any variables on the Variables sheet, the left side of the Calculate sheet is where you can set the frequency and/or set values for variables (if any) for the test cases to be run through EZNEC. Then the right side of the Calculate sheet (and the other remaining AutoEZ sheets) shows the results of the EZNEC runs.
The screen shot below shows the Calculate sheet after opening BYVEE.ez and running a calculation. Since there is only one test case (that is, no variables are being used and no frequency sweep is being requested), the Calculate All Rows and Calculate Only Selected Row(s) buttons both do the same thing.
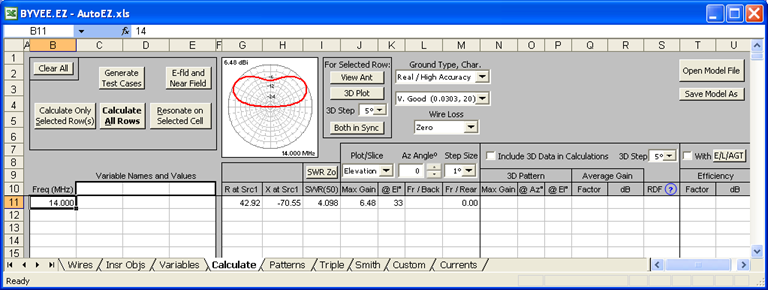
Clicking either button will result in this sequence of events:
- AutoEZ will build a temporary .ez format binary file using the specified frequency and the specified values for any variables you may have identified (none in this case).
- AutoEZ will invoke EZNEC and request that EZNEC a) open the temporary file just built, b) run it through the EZNEC calculating engine, and c) produce output files containing the results of the calculation.
- When EZNEC is finished and the output files are ready, AutoEZ will read and parse the files. Some results are shown on the right-hand side of the Calculate sheet. Other items are presented as Excel charts on the remaining AutoEZ sheets.
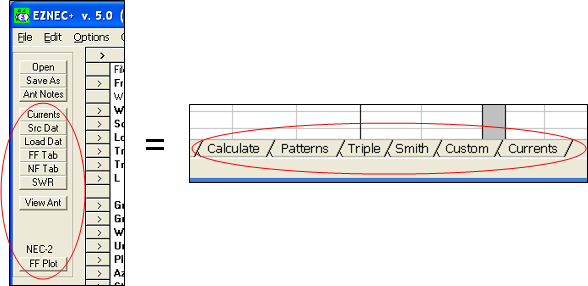
Another way to compare the operation of EZNEC versus AutoEZ is as follows: Under EZNEC, after you have created and/or modified the model using the Wires window and other windows, you click a button such as Src Dat or FF Plot to run the calculating engine and see the results. Under AutoEZ, after you have created and/or modified the model using the Wires and Insr Objs sheets (and possibly the Variables sheet), you click one of the Calculate buttons mentioned above and then see the results on the right-hand side of the Calculate sheet and on the other sheets such as Patterns and Triple.
Of course AutoEZ can do more than just mimic the operation of EZNEC. After all, that's why Auto is part of the name! For example, suppose you wanted to change the height (distance along the Z axis above ground) of the antenna. Normally you would have to change the values of the
End 1 andEnd 2 Z coordinates, run a calculation, change the values again, run another calculation, and so on.By using a variable to control the height, AutoEZ can simplify and automate the whole process. Here's how.
Step 5 - Use AutoEZ Variables
Tab back to the Wires sheet and click the Move/Copy button. In the dialog that appears, enter "=H" (without the quotes) in the "Z axis delta" field. The letter "H" can be upper or lower case, it doesn't matter.
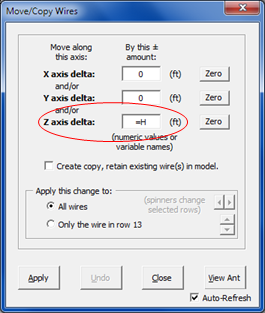
Variable H is being used to change the height of the model by moving all wires along the Z axis. It is not necessary to create any Excel formulas to modify the XYZ coordinates of the wire ends; AutoEZ takes care of that under the covers.
There is nothing special about H as the variable name in this example. You are free to use any valid AutoEZ variable name that seems logical to you, such as O (for offset) or D (for delta amount) or Z (for Z axis delta).
In addition to move/copy, there are similar AutoEZ built-in functions that allow you to rotate one or more wires by a specified amount, scale one or more wires by a specified amount, and change the segmentation level of one or more wires by a specified amount. In all cases, the "specified amount" can be either an explicit numeric value or a value that is controlled by a variable (as in this example).
Notice the equals sign (=) before the H. Whenever you want to tell Excel "the value of this field should be set equal to the current value for this variable" it is necessary to use a leading equals sign. In the dialog windows AutoEZ will include the sign if you forget, but that's not the case when you enter formulas directly in cells on a worksheet.
Click Apply and then Close in the dialog window. You'll see this message.
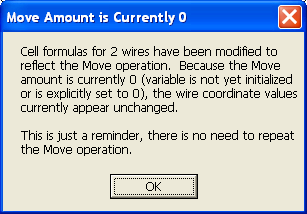
This isn't an error, you haven't done anything wrong, and there is no need to repeat the Move/Copy operation. It just reminds you that the variable being used to control the move amount (H in this case) has not yet been given a specific value. Since all variables have a default value of zero it appears (for now) that the Z axis coordinates for the wires have not changed. So let's see how to set values for H. Click OK to dismiss the reminder message.
Tab back to the Calculate sheet. In column B enter the same frequency for two more rows. You can just type "14" (without quotes), you don't have to explicitly enter the trailing ".000". Then specify that variable H is to have values of 0, 10, and 20. You do that by entering "H" (without quotes, upper or lower case) in cell C10, then values of 0, 10, and 20 in cells C11 through C13. Don't forget to press Enter after you've typed the final value of 20 in cell C13. On the Calculate sheet you do not put an equals sign before the H. Here you are merely telling AutoEZ which variable to change and what values it should have for the test cases.
Remember that H is the Z axis delta amount. So the first test case (row 11) won't change the height of the model, the second test case (row 12) will increase the height by 10 feet, and the third test case (row 13) will increase the height by 20 feet.
(International users: If you would prefer to work in units of meters see Step 7 below.)
Click the Calculate All Rows button. If nothing happens when you click the button it's probably because you forgot to press Enter after typing the final value of 20.
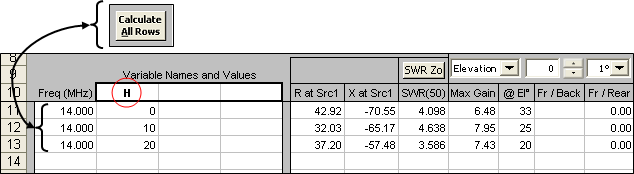
Above are the results. The first row is the same as before, as it should be, since the first test case did not change the height. The next two rows show the calculated results when the model has been raised by amounts of 10 and 20 feet. Other AutoEZ sheets have charts (the Excel term for plots or graphs) showing the results of all the calculations, in different formats depending on the chart.
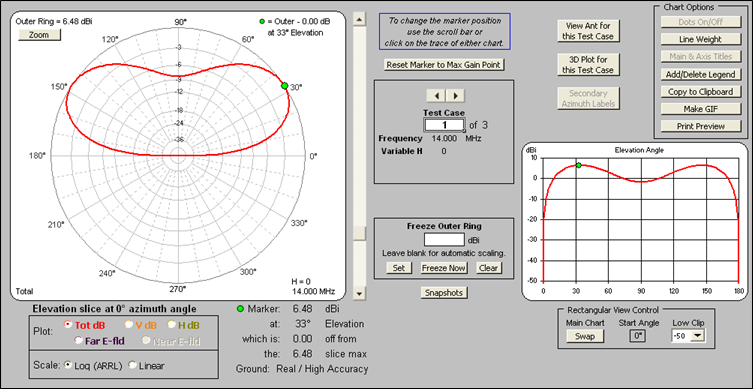
For example, the Patterns sheet would show the far-field pattern for each test case in both polar and rectangular formats. You can choose to view the Total field or just the Vertical or Horizontal component. As with EZNEC, you can position a marker at any point on the pattern to get detailed information.
By using the spin button on the Patterns sheet (the button with the left/right arrows, above the words "Test Case") you can quickly flip from one test case to another. By pressing and holding the spin button you can see an animation of how the pattern changes as the model configuration is changed, in this case as the wires move higher.
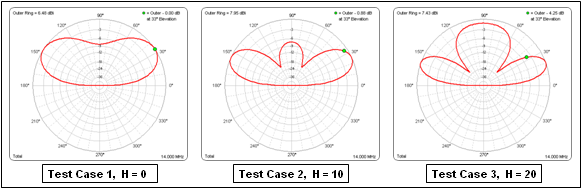
These are the three "frames" of the animation for this set of test cases. Being able to quickly flip from one to another, or show them one after another in quick succession, may give you new insights into the performance of your antenna.
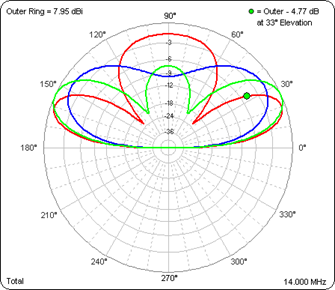
If desired, you can use the Snapshots button to show multiple patterns on the same plot. Above, the pattern for test case 1 is shown in blue, test case 2 in green, and test case 3 in red. This AutoEZ feature is very similar to the "Add Trace" feature on the EZNEC 2D Plot window.
Now suppose that, rather than raise the height of the model, you want to control the slant leg length for each side of the vee. How can you do that? With some high school trigonometry you could probably figure out what the Y and Z coordinates should be for the lower end of each of the two wires given a desired leg length, but how can you use a variable to control the leg length?

Let's see how you can use variables and Excel formulas to do what you want.
Step 6 - Use Excel Formulas
Open model "Vee With Formulas.weq". This model has the same geometry as BYVEE.ez from above.

Above on the right is a portion of the Variables sheet for the "Vee With Formulas.weq" model. Variable A is being used to control the apex angle where the two wires meet, variable H controls the apex height, and variable L controls the slant leg length. Note the subtle change in the use of variable H. In the previous example H was used to control the Z axis delta height of the wires. In this example, H is used to control the Z axis absolute height of the apex. When you work with different models or different model files, in this case "BYVEE.ez" and "Vee With Formulas.weq", you are free to re-use variable names in any way you please.
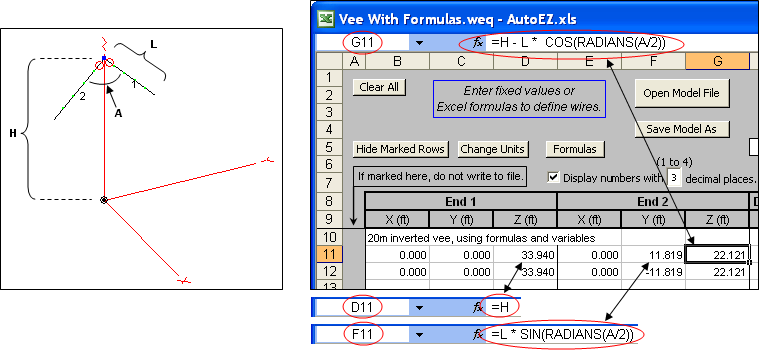
On the Wires sheet, above are the formulas you see if you click on cell G11 (or F11 or D11). Cell G11 is the Z coordinate for Wire 1
End 2 .(End 2 is the "outer" end of each wire,End 1 is the "apex" end.) Note how the A, H, and L variables are used, along with the Excel COS, SIN, and RADIANS built-in functions. L times the COS function gives the portion of L along the Z axis; L times the SIN function gives the portion of L along the Y axis. Angles used with the COS and SIN functions must be expressed in radians, not degrees. (For a quick review of sine and cosine see this handy web page).You can click on any individual cell to see the formula for that cell (if any) displayed in the Excel "formula bar". If you want to see all the formulas at one time, there's a special Formulas button to do just that.
Back on the Calculate sheet, set up the left side to run a "variable sweep" for variable L. A "variable sweep" is similar to the more familiar frequency sweep except that you are changing the geometry of the model (or whatever the variable or variables being swept control) instead of the frequency. In this case the left side of the Calculate sheet is set correctly already because that information is saved as part of the ".weq" file format. If this were a new model you just created you might want to use the Generate Test Cases button to do the setup rather than typing all the values separately.
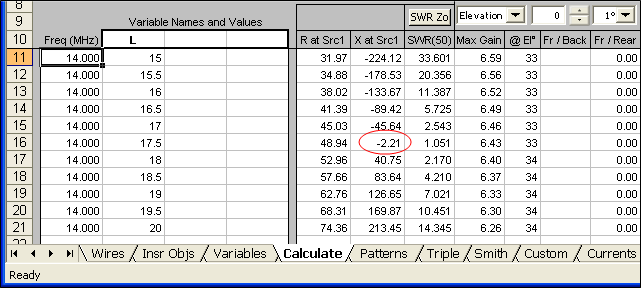
After clicking the Calculate All Rows button this is what you'll see on the right side of the Calculate sheet. Note that for this particular apex angle and apex height, the antenna is just about resonant (reactance value
-2.21 ohms) at a leg length of 17.5 feet.Of course it would make no difference in the real world, but suppose you wanted to know the exact leg length at which the antenna would be resonant under the above conditions. Or, a more likely scenario, suppose you hadn't bothered to run a variable sweep. Instead you just gave L an initial value based on a rule-of-thumb such as
one-half of468/F(MHz), which would be about 16.7 feet in this case. And now you want to know the exact length that will produce resonance. That's where the Resonate button comes in handy.
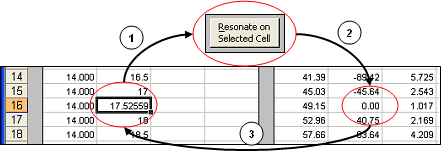
Select cell C16, the cell in row 16 that has the "17.5" entry, then click the Resonate button. AutoEZ will automatically adjust variable L such that the reactance (X) at Source 1 has an absolute value of nearly zero. When the calculations are complete, the cell you clicked will show the new (adjusted) value.
You can use the Resonate button to adjust either the frequency or any variable that produces a change in the source reactance. The variable might change the length of a linear element, the circumference of a loop element, the inductance of a loading coil, or the placement (percent from
End 1 ) of a pair of loading coils. Any variable that controls any aspect of your model that causes a change in source reactance is a candidate.
Step 7 - Change Units
In the previous two steps the models "BYVEE.ez" and "Vee With Formulas.weq" were defined with units of feet. Suppose you wanted to use meters instead. Just click the small Change Units button found on both the Wires and Variables sheets.
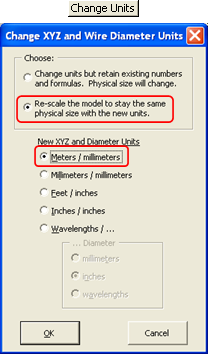
The top portion of the dialog presents two choices. If you are working with an existing model that uses straight numeric values for the XYZ coordinates, such as BYVEE.ez or any other EZNEC type model, and you want to use different units but keep the physical size of the model the same, select the second option.
For example, in Step 5 the Z axis coordinates for model BYVEE.ez are incremented by 10 and 20 feet. To use meters instead of feet:
The calculated results will be exactly the same.
- Open BYVEE.ez to start with a fresh copy.
- First change the model units to meters with the "Re-scale" choice, as shown above.
- Then use the Move/Copy button with variable H.
- On the Calculate sheet enter test case values of 3.048 and 6.096 (or 3,048 and 6,096 if appropriate for your regional settings).

On the other hand, if you are working with a model that uses variables and formulas for the XYZ coordinates, such as "Vee With Formulas.weq", you'll probably want to choose the first option. The units will be changed but your formulas will not be modified in any way. Of course if you want the physical size to stay the same you'll have to change the values for the variables.
For example, in Step 6 the leg length of model "Vee With Formulas.weq" is defined using variable L. When setting up the test cases on the Calculate sheet you probably do not want the leg length to range from 15 to 20 meters so instead enter test case values on the order of 4.5 to 6 (or 4,5 to 6). You may wish to also change H to something like 10 meters. At an apex height of 10 meters the antenna will be resonant with a leg length of 5.339 meters.
You should also choose the first option if you are creating a new model with straight numeric coordinates, have entered several values, and then realize that the XYZ units are not correct. The first option will change the units but will not modify the entries you have made already.
When you finish a session with AutoEZ do not hesitate to save the workbook, thinking that you "might mess something up." It's very unlikely that you'll do that and you can always run the installer program (Setup.exe) again to reinstall the entire package. Any model files that you may have created will not be deleted, moved, or modified in any way.
That concludes this very brief tour through some of the features of AutoEZ. To learn more see any of the "Detailed Information" links at the top of this page.