Use Variables to set XYZ Coordinates
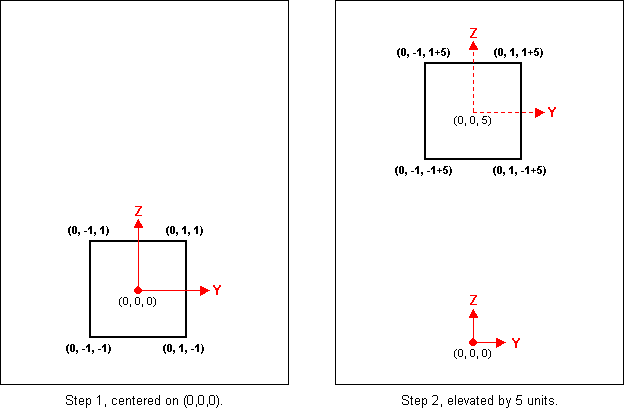
Suppose you wanted to create a square loop with a total circumference of 8 units. If the loop were to be in the YZ plane and centered on the
(0, 0, 0) point it would have(X, Y, Z) corner coordinates as shown in the left image below, where each value for a Y and Z coordinate is either +1 or-1 (8 units circumference divided by 4 sides equals 2 units per side, split on either side of the axis equals ±1). Then if you wanted to raise the entire loop by a distance of 5 units in the +Z direction, the coordinates would be as shown in the right image. The X and Y coordinates stay exactly the same and the Z coordinates are all incremented by 5 units. (Note the change of the center point in the right image.)
Now think in terms of variables instead of actual numbers. Every place you see a "1" in the above diagrams mentally substitute a variable name, say D, while keeping the same sign. Every place you see a "5" substitute a different variable name, perhaps B. The variable names don't have to "stand for" anything or be "the first letter of" anything, they are just general purpose variables.
Using variables to define the wire coordinates is as simple as that. If you wanted to have the circumference of your loop be 100 units instead of 8 units you could set variable D equal to 1/8 of 100 or 12.5. If you wanted the center of the loop to be 50 units above the ground you could set variable B equal to 50. Then if you wanted to change the loop size or height you could just change the variable values rather than changing all the individual wire coordinate sets.
So let's build a model using this loop. More specifically, let's build a model with two loops like this for a 14 MHz quad using equations found in the ARRL Antenna Book (circumference in feet).

Hint: If you're feeling a bit confused you can open model "Sample Quad A.weq" and refer to that as you follow the steps below, rather than entering everything from scratch. Then just skip use of the Clear All buttons mentioned in the following paragraphs. Be careful, there is also a model named "Sample Quad B.weq", not what you want just yet.
Per the above ARRL equations, at 14 MHz the driver circumference is 1008 divided by 14 equals 72 ft, so variable D should be set to 72 divided by 8 equals 9. We'll put the center of the loop 50 ft above ground so variable B should be set to 50. Since the reflector loop is a different size we need a different variable, say E. At 14 MHz variable E should be set to 1045 divided by 14, divided by 8 equals 9.33. Finally we need one more variable to control the X axis spacing (in and out of the page in the above diagrams). Variable A is available, we'll use that with a value to be set in just a moment.
Tab to the Variables sheet and click the small Clear All button in the
upper-left corner. If necessary click the Change Units button and select the"Feet/inches" option. Set the frequency to 14, variable B to 50, variable D to 9, and variable E to 9.33.What about A, the X axis spacing? The ARRL Antenna Book suggests 0.14 to 0.2 free space wavelengths. When you change the frequency on the Variables sheet you can see the length of 1 wavelength plus various fractions of a wavelength. Set A to 70.2551 times 0.2 equals about 14.
After you've set all the values add some short comments to help you remember which variable means what. Here's what the Variables sheet might look like.
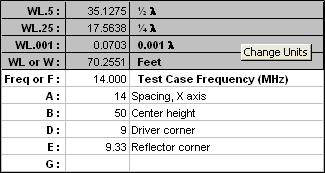
You can use any of 100 variable names, A through CZ with the following exceptions: Names F and W are reserved to indicate Frequency and Wavelength. They may be used in any of your formulas. You may also use names Freq and WL for these items if you prefer. Variable names WL.5, WL.25, and WL.001 are also available, pre-defined to equal ½ λ, ¼ λ, and 0.001 λ respectively. You may use these in formulas, but they are presented more just for information and reference. Names C and R are not available because they are reserved for Excel internal use to reference Columns and Rows on a worksheet.
Now for the actual XYZ coordinates. Recall that in the original "circumference of 8 and elevated by 5" loop the intent was to substitute ±D for every ±1 and to substitute B for every 5. And, if you prefer, "D+B" can become "B+D" and
"-D+B" can become"B-D".
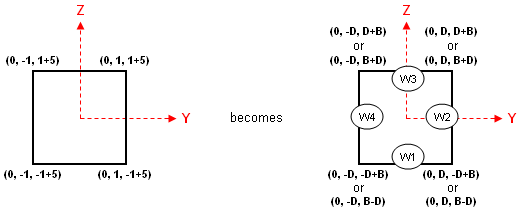
For the reflector loop the coordinates are almost the same except that E is used instead of D and either A or
-A is used instead of 0. (To have the main radiation lobe point in the direction of the positive X axis you need to put the reflector "behind" the driver, which means use-A . That's the convention followed for this example although that choice is up to you.)Tab to the Wires sheet and again click the small Clear All button in the
upper-left corner. In cell B10 enter a short title for the model, perhaps "Sample Quad". Wire 1 of the model will be the bottom wire of the driver loop; the other 3 driver wires will be defined in CCW order around the loop. So in cell B11 type "0" (without the quotes) for theEnd 1 X coordinate of wire 1, then press either the Tab key or the right-arrow key to move to theEnd 1 Y coordinate cell.Type "=-D" (again without the quotes, as is the case for all the following cell entries). In Excel, every formula must begin with an equals sign and the equals sign must be the first character. After the first character you can include spaces if you like just to make the formula easier to read. You can type variable names in upper or lower case, Excel will convert everything you type to upper case.
If you enter a formula and then realize you've made a mistake, or perhaps entered the correct formula but in the wrong cell, don't use the space bar to "blank out" the entry. Use the keyboard Delete key instead. In Excel the Delete key is used to clear the contents of a cell. If you use the space bar you are not "clearing" the cell, you are filling it with one or more spaces. The cell is not cleared or empty, it's filled with characters you just can't see. So use the Delete key. Or, if you prefer,
right-click on the cell and choose the "Clear Contents" option.Press either the Tab key or the right-arrow key to move to the
End 1 Z coordinate cell, type"=B-D" (or"=-D+B" , your choice), then press Enter. That completes the definition forEnd 1 of wire 1. The Wires sheet should look like this.

You could continue entering coordinate formulas on the Wires sheet but there's a drawback to that. On the Wires sheet, as soon as you finish typing a formula and either move to another cell or press Enter, Excel shows the equivalent value for the formula you entered. It might be nice to instead see the formula itself. To do that click the Formulas button.
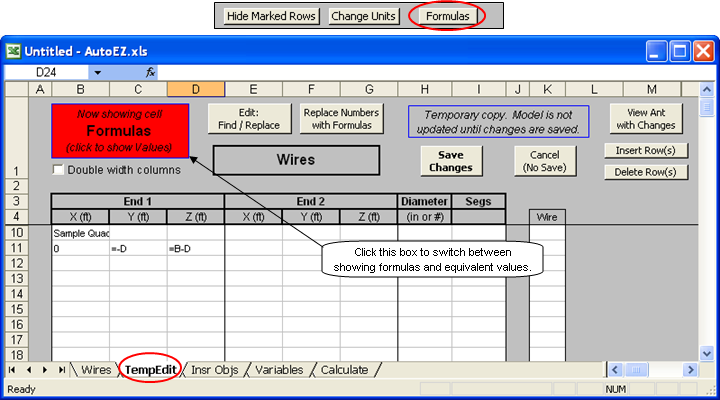
A new sheet tab, TempEdit, will appear. On this sheet you can switch at will between seeing the formulas you enter and the resulting equivalent values for those formulas.
Select cell E11, the
End 2 X coordinate of wire 1. Then"0", Tab (or right arrow), "=D", Tab, "=B-D" (or "=-D+B", your choice), Tab, "#14", Tab, "7", Enter.The last two entries, "#14" and "7", were for the wire diameter and the number of segments. The EZNEC conservative segmentation density is 20 segments per wavelength or 5 per ¼ λ. Since each side of this loop is 18 ft long and ¼ λ is about 17.56 ft at 14 MHz, each side is slightly longer than ¼ λ. Hence 5 segments per side would not quite meet the conservative level but 6 would. However, the loop will eventually have a source placed in the middle of wire 1 which means an odd number of segments must be used so 7 it is.Now for wire 2. You could enter the 3 XYZ coordinates for
End 1 of wire 2 directly but there's an easier way. Wire 2End 1 is connected to (has the same coordinates as) Wire 1End 2 . So select any of the Wire 2End 1 XYZ cells, type "w1e2" (without quotes), and then Tab, right-arrow, or Enter.

The "w#e#" (or upper case "W#E#") notation is very similar to the same "Connect End To" shortcut that you can use on the EZNEC Wires window. The minor difference is that in EZNEC the "other" end of the wire is set to (0,0,0) if not set already. In AutoEZ the other end is left blank if not set already. You can use this shortcut on the Wires sheet or when working with wires on the TempEdit sheet. (Note that EZNEC has several other wire shortcuts, none of which are available in AutoEZ.)
Complete the definition for
End 2 of wire 2 by entering "0", "=D", and "=B+D". For wire 3 select cell D13, theEnd 1 Z coordinate. Then"w2e2", Tab, "0", Tab, "=-D", Tab, "=B+D", Enter.Then select cell D14 and"w3e2", Tab, "w1e1", Enter.Since you entered the shortcuts in column D, theEnd 1 Z coordinate column, only one Tab (or right-arrow) key press was needed to get to theEnd 2 X coordinate cell. From there you can enter the 3End 2 XYZ coordinates or, in the case of wire 4, a second shortcut notation.That completes the definition of the driver loop. For the reflector loop you could follow a similar procedure, using "E" instead of "D" for the YZ coordinates formulas and using "=-A" instead of "0" for all the X coordinates. But again there's an easier way. Select all the cells that make up the driver loop. To do that first select cell B11, hold down the left mouse button, then drag over and down to cell I14. Release the mouse button and press Ctrl-C (copy). Then select cell B15, the
upper-left corner of where you want to paste, and press Ctrl-V. Finally, press Esc to clear the moving border around the copied cells.
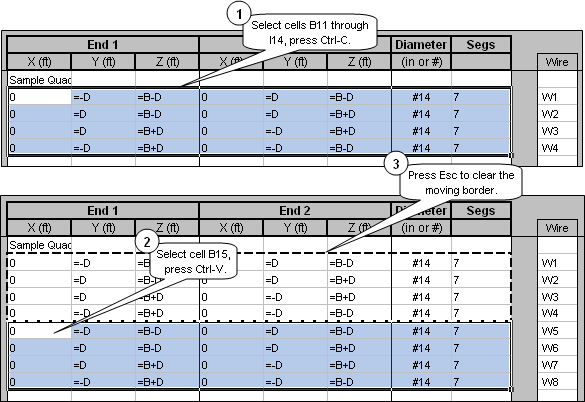
Now you have four more wires which are exact copies of the first four. You can use the standard Excel
Find/Replace function to replace all instances of "D" with "E" and all instances of "0" with "=-A". But, you have to restrict the replace operation to just the four new rows.To do that, first select cells B15 through I18 (the four new rows), then click the
Edit: Find/Replace button. In the dialog window, make sure the "Match entire cell contents" box is unchecked, type "D" in the 'Find what:' field and "E" in the 'Replace with:' field. Click Replace All. Then repeat, replacing "0" with "=-A".
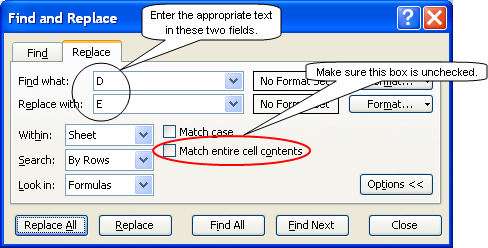
When you invoke the Find/Replace function with just a single cell selected, Excel will make replacements in the entire sheet. That's not what you want in this case else you would replace "D" with "E" in all the rows instead of just the four new rows. However, when you invoke the Find/Replace function with multiple cells selected, Excel will make replacements in only the selected cells.
Caution: If you click Find All prior to Replace All, Excel will change your multiple cell selection to just a single cell. If you fail to notice that and then click Replace All the replace operation will include the entire sheet as mentioned above.
Also, don't confuse the
Edit: Find/Replace button with the Replace Numbers with Formulas button. That second button is for a more advanced feature explained elsewhere in the AutoEZ documentation.Almost done, just a few cosmetic additions. It might be nice to identify which four wires are the driver and which four are the reflector. To make room for the annotations use the Insert Row(s) button. Select cell B11, click the button, and enter "Driver loop" in the new row. Then select cell B16 (was B15), click the button, and enter "Reflector loop" in the new row. Note that the text appears truncated. This is normal when viewing formulas. To see the full text you can click the large red box to switch to viewing values or you can check the Double width columns box.
You might also want to identify which wire is to have the source. You can use column J for that, entering "Src" (or any few characters of your choosing) in cell J12. Entries in the J column are saved as part of your model file.
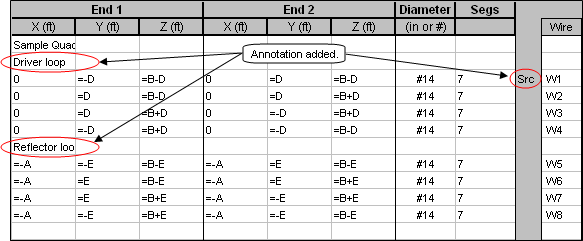
Don't forget to click the Save Changes button. That will transfer all the changes you have made on the TempEdit sheet back to the Wires sheet. Then to complete the definition of your model you need to specify the source, although you may have done that already. If necessary, tab to the Insr Objs sheet, define the source, and remove any additional sources that may be present. Clear any entries in all of the other Insr Objs tables.

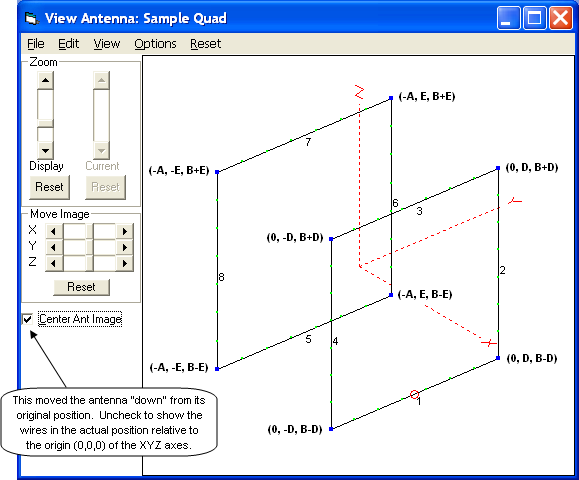
If you now click the View Ant button the antenna should look like this. Note that in this view the dashed lines for the three axes represent only relative directions. The intersection of the three dashed lines is not position
(0,0,0).
Note to AO and 4nec2 users: If you have experience with other programs that permit the use of variables for wire XYZ coordinates, such as AO by Brian Beezley or 4nec2 by Arie Voors, you may be used to thinking that you can use only a simple variable name in place of a numeric coordinate. That is not the case with AutoEZ. You can use a simple formula (like "=A") or a formula that includes mathematical operations (like "=B+E" or even "=B*SQRT(E+10)+F"). You don't have to define "intermediate variables" to do the mathematical operations.
Use Formulas to Set Variables
In the previous section you saw how to use variables, via Excel formulas, to set the values for the XYZ coordinates of a model. In this section you'll see how to use formulas to set variables.
What? Isn't that circular logic? If variables are used to set values via formulas, how can a formula be used to set the value of a variable? Let's see.
If you didn't bother to work through the steps of the previous section you can just open the "Sample Quad A.weq" model file. Then tab to the Calculate sheet and set or confirm the modeling environment as shown below.

Now suppose you wanted to experiment with changing the spacing between the two loops. That aspect of the model is controlled by variable A so you could create a series of test case rows on the left side of the Calculate sheet, click the Calculate All Rows button, then view the results on the right side of the Calculate sheet and on the other sheet tabs. The "Max Gain and Fr/Rear" chart is just one of the charts available.
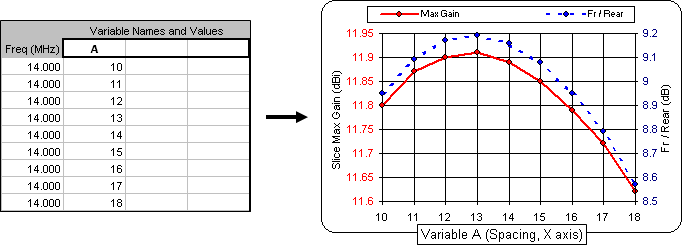
Hint: The Calculate All Rows button has an accelerator key assigned to it, Alt-A. If your fingers happen to already be on the keyboard after having typed some test case entries there is no need to reach for the mouse. Just press Alt-A.
If you wanted to experiment with changing the absolute sizes of the two loops while keeping the relative sizes the same you might use the remaining two columns on the left side of the Calculate sheet to set variables D and E.
Why use all three columns? Why not just clear the first column which, for the previous use of the Calculate All Rows button, was used to vary the value for variable A?
To answer that question you have to know a little about the internals of AutoEZ. AutoEZ actually changes the values on the Variables sheet for the frequency and all variables (if any) that are set via a test case row. When the calculations are complete the value(s) for the variable(s) will be as set on the last test case row. (Or on the last calculated row if you used the Calculate Only Selected Row(s) button.)
When you were experimenting with changing the spacing between the loops by changing variable A the final test case row left A with a value of 18. If you want A to revert back to its original value of 14 you have to either manually reset it yourself on the Variables sheet or include it in a test case row. So for this new set of test cases, making entries as shown below on the left would a) insure that variable A has the value you want it to have, and b) leave the Variables sheet in the state as shown below on the right.

Now back to the matter of changing the loop sizes. In the original model definition the driver loop had a circumference of 72 ft which resulted in using "9" as the corner coordinate. The reflector loop had a circumference of 74.64 ft which resulted in using "9.33" as the corner coordinate. The reflector is 3.7% larger than the driver. To keep the reflector the same relative size you have to multiply each test case driver value (variable D) by 1.037 and then enter that value in the column for variable E, as shown above.
Obviously there's a better way than manually calculating and entering all those values for variable E. On the Variables sheet enter a formula for variable E, replacing whatever numeric value is in cell C15.

Then you could use a simplified test case setup which would lead to a new set of calculated results. Again, the chart shown is just one of the charts available.
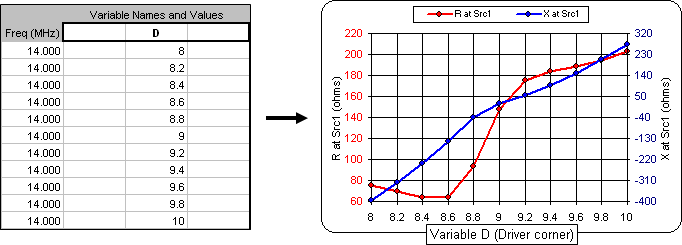
Changing variable D via the test case rows automatically also changes variable E. And since variable A has been reset back to "14" there is no longer a need to include it in the test case setup. (If your chart doesn't look like the one above you probably forgot to set variable A back to "14" and/or enter the formula
"=D * 1.037" for variable E.)And that's how you use formulas to set variables.
An Alternate Approach for Quads
In the above examples variable D was set by dividing the driver circumference by 8 and variable E was set by dividing the reflector circumference by 8. That made the two variables suitable for use as "corner coordinates" for the wire XYZ formulas. But what if you would rather define your loops in terms of actual circumference, such as "72" for the driver and "74.643" for the reflector? Neither of those numbers can be used in the formulas for XYZ coordinates. What can you do?
Just include the "divide by 8" as part of the formula for the coordinates. Remember, unlike with some other programs, with AutoEZ you are free to make the XYZ coordinate formulas as simple or as complicated as you wish.
The initial values on the Variables sheet would look like this.

And the XYZ coordinate formulas would look like this.

Other than that all the other steps described above are the same. You can still use the "W#E#" type shortcut when creating the model and you can still use a formula such as
"=D * 1.037" for variable E. And don't worry about multiple uses of "divide by 8" in many different cell formulas being "inefficient". That's just the sort of thing that modern computers do very, very fast.Sample model "Sample Quad B.weq" illustrates this technique. If you want to build your own quad models using the "divide by 8" technique for the XYZ coordinates you can use this sample as a starting point, then save your work using a different file name.